 Programming Pixels
Handling a title screen, game flow and buttons in pygame.
Published by Danny Barthaud on Thu 12 September 2019.
We build a basic menu system to navigate between different stages of a game.
This blog post also comes in video form. The content should be the same so you're free to watch or read as you wish.
Pygame has no built in UI components
Without buttons it can be difficult to handle title screens, game menus and the general flow of the game from one stage to another. There are a few libraries for creating ui elements that are designed to work with pygame but many of them are abandoned and if you do find one in development you'll have to conform to its conventions. Fortunately it's not difficult to make your own buttons and menu system, and if you do you'll retain complete control over the way your game runs.
There's a lot of really fancy menu design in games now, menu items can be buttons with backgrounds, text that changes shape and/ or colour when selected etc. We're not going to go over every possible effect that a UI element could have but instead we're going to focus on getting something basic working that can be easily built on so we can also cover how these UI elements can fit neatly into our game's logic.
We're going for simple interactive elements that are text only and increase in size a little when selected. All steps shown in this tutorial are included in this gist.
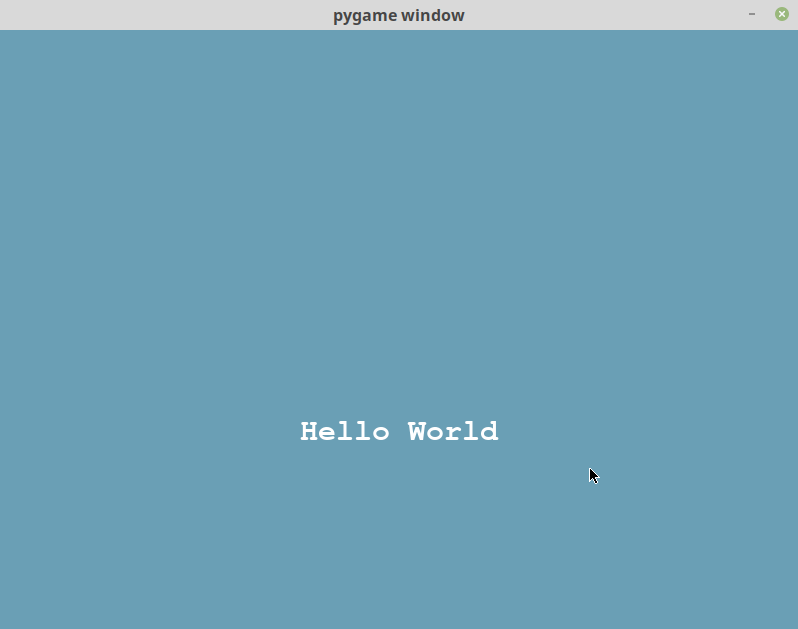
Step 1: Responsive text
We'll start by making text that responds when the mouse is over it. Here's what we should have at the end of this step.
We'll need some imports, the rgb values of few colours for convenience and a small helper function that renders text onto a surface. (The convert_alpha method is a small optimisation that enables the surface to be more quickly blitted to the screen).
import pygame
import pygame.freetype
from pygame.sprite import Sprite
from pygame.rect import Rect

BLUE = (106, 159, 181)
WHITE = (255, 255, 255)


def create_surface_with_text(text, font_size, text_rgb, bg_rgb):
    """ Returns surface with text written on """
    font = pygame.freetype.SysFont("Courier", font_size, bold=True)
    surface, _ = font.render(text=text, fgcolor=text_rgb, bgcolor=bg_rgb)
    return surface.convert_alpha()
For our UI element we're going to create a subclass of pygame's Sprite class, this means we can render them with pygame's sprite render classes if we want to but we'll also add a draw method in case we don't (we won't use them until the very end). In the init method we'll create images for the button when the mouse is over and when it isn't.
class UIElement(Sprite):
    """ An user interface element that can be added to a surface """

    def __init__(self, center_position, text, font_size, bg_rgb, text_rgb):
        """
        Args:
            center_position - tuple (x, y)
            text - string of text to write
            font_size - int
            bg_rgb (background colour) - tuple (r, g, b)
            text_rgb (text colour) - tuple (r, g, b)
        """
        self.mouse_over = False  # indicates if the mouse is over the element

        # create the default image
        default_image = create_surface_with_text(
            text=text, font_size=font_size, text_rgb=text_rgb, bg_rgb=bg_rgb
        )

        # create the image that shows when mouse is over the element
        highlighted_image = create_surface_with_text(
            text=text, font_size=font_size * 1.2, text_rgb=text_rgb, bg_rgb=bg_rgb
        )

        # add both images and their rects to lists
        self.images = [default_image, highlighted_image]
        self.rects = [
            default_image.get_rect(center=center_position),
            highlighted_image.get_rect(center=center_position),
        ]

        # calls the init method of the parent sprite class
        super().__init__()
We'll add a few properties to the class that change values depending on whether mouse_over is true or not.
# properties that vary the image and its rect when the mouse is over the element
@property
def image(self):
    return self.images[1] if self.mouse_over else self.images[0]

@property
def rect(self):
    return self.rects[1] if self.mouse_over else self.rects[0]
To finish off the class add update and draw methods to the class. All the update method does for now is sets the mouse_over value depending on whether the user's cursor is over the text or not.
def update(self, mouse_pos):
    if self.rect.collidepoint(mouse_pos):
        self.mouse_over = True
    else:
        self.mouse_over = False

def draw(self, surface):
    """ Draws element onto a surface """
    surface.blit(self.image, self.rect)
Now to a button and game loop where we update the ui element with the current mouse position.
def main():
    pygame.init()

    screen = pygame.display.set_mode((800, 600))

    # create a ui element
    uielement = UIElement(
        center_position=(400, 400),
        font_size=30,
        bg_rgb=BLUE,
        text_rgb=WHITE,
        text="Hello World",
    )

    # main loop
    while True:
        for event in pygame.event.get():
            pass
        screen.fill(BLUE)

        uielement.update(pygame.mouse.get_pos())
        uielement.draw(screen)
        pygame.display.flip()


# call main when the script is run
if __name__ == "__main__":
    main()
That's step 1 complete. If running your script doesn't give you the same result as the gif shown at the start of this step then compare your script to this gist.
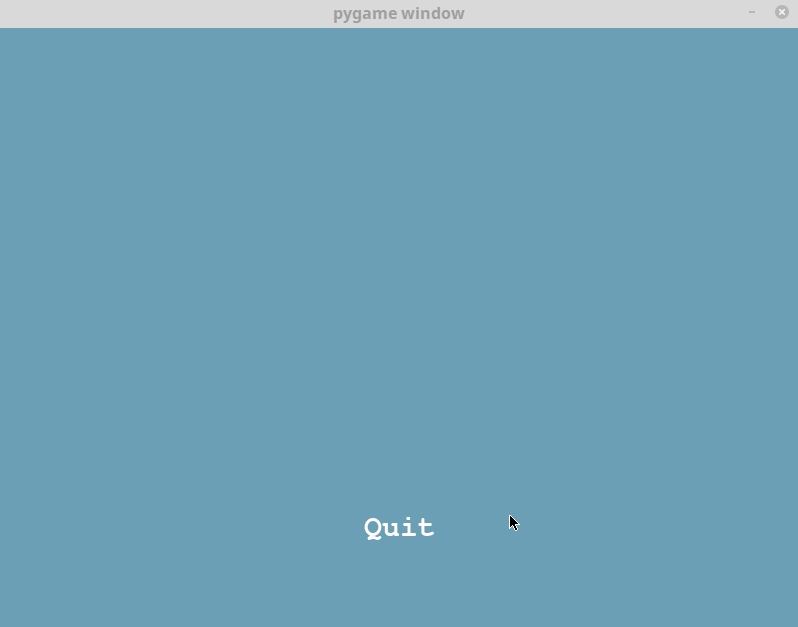
Step 2: Handling clicks
In step 1 the text increases in size when you mouse over to indicate that it's interactive but clicking it doesn't actually doing anything yet.
In this step we're going to make our buttons responsive to mouse clicks and create a quit button that closes the application. Here's what we should have at the end of this step.
A short aside: Some people advocate for sending a function as an argument to a button (that is a function name without brackets) so that on a click event, the button can call the function. That's ok for short running functions (say for instance that you just want to add some score every time you click on the button) but you don't want to have a button calling a function that changes the level, or goes back to the main menu because the button will remain in the heap since you are still in one of its functions. As you press more and more buttons your application will have to retain all button instances in memory and store other objects that were loaded in the pursuit of loading more buttons (level instances etc.).
I prefer to use enums to move between game states, so we will pass in enum values when the button is created and check for state changes in a little loop.
Don't worry if that's not very clear yet, it should become clear as we work through this step.
Add Enum to our list of imports at the top of the file.
from enum import Enum
Add an action argument to the init method of the UIElement, the method declaration should look like this
def __init__(self, center_position, text, font_size, bg_rgb, text_rgb, action=None):
At the bottom of the __init__ method, assign action to an instance variable
self.action = action
We need to change the update method of the UIElement to check for mouse clicks, we'll do that by passing in a value for mouse_up when we call the button's update method. When the mouse is clicked on an element, the element returns the value stored in it's action variable.
def update(self, mouse_pos, mouse_up):
    """ Updates the element's appearance depending on the mouse position
        and returns the button's action if clicked.
    """
    if self.rect.collidepoint(mouse_pos):
        self.mouse_over = True
        if mouse_up:
            return self.action
    else:
        self.mouse_over = False
Create and enum class with one possible action: Quit.
class GameState(Enum):
    QUIT = -1
We need to change the main function to add a quit button. In the main loop the pygame event queue is checked to see if the primary mouse button has been clicked (we're using the mouse up event which fires after the mouse button has been pushed down and then released 'up'). The mouse position and the mouse_up status are then passed into the update function of the button. If the button has been clicked, the update function will return a GameState enum value, since there's only one possible GameState that could be returned (quit) we stop the application.
def main():
    pygame.init()

    screen = pygame.display.set_mode((800, 600))

    quit_btn = UIElement(
        center_position=(400, 500),
        font_size=30,
        bg_rgb=BLUE,
        text_rgb=WHITE,
        text="Quit",
        action=GameState.QUIT,
    )

    # main loop
    while True:
        mouse_up = False
        for event in pygame.event.get():
            if event.type == pygame.MOUSEBUTTONUP and event.button == 1:
                mouse_up = True
        screen.fill(BLUE)

        ui_action = quit_btn.update(pygame.mouse.get_pos(), mouse_up)
        if ui_action is not None:
            return
        quit_btn.draw(screen)
        pygame.display.flip()
That's step 2 complete. If running your script doesn't give you the same result as the gif shown at the start of this step then compare your script to this gist.
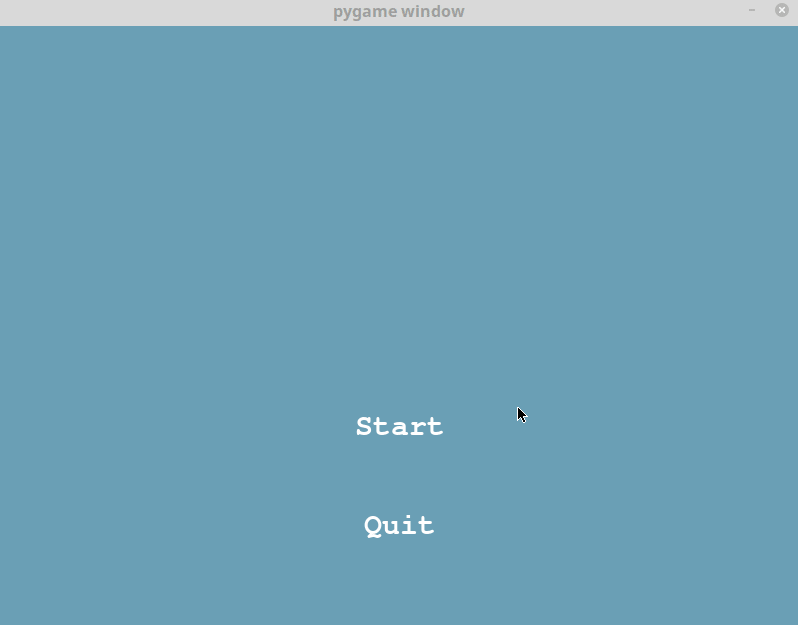
Step 3: Add to the title screen and make a level
Our UIElement class is finished and working but our game still only has one screen and all you can do is quit. We're going to expand our example so we have a start button on the title screen as well as a quit and a return to main menu option in a level.
Start by adding all the options we'll need to the GameState enum.
class GameState(Enum):
    QUIT = -1
    TITLE = 0
    NEWGAME = 1
We're going to change our main function quite a lot, we are no longer going to load button objects in it. Instead it'll be used as sort of game state handling function, loading different functions that are called based on the current game_state. When buttons are pushed in the title_screen or the play_level functions, a new GameState value is returned.
def main():
    pygame.init()

    screen = pygame.display.set_mode((800, 600))
    game_state = GameState.TITLE

    while True:
        if game_state == GameState.TITLE:
            game_state = title_screen(screen)

        if game_state == GameState.NEWGAME:
            game_state = play_level(screen)

        if game_state == GameState.QUIT:
            pygame.quit()
            return
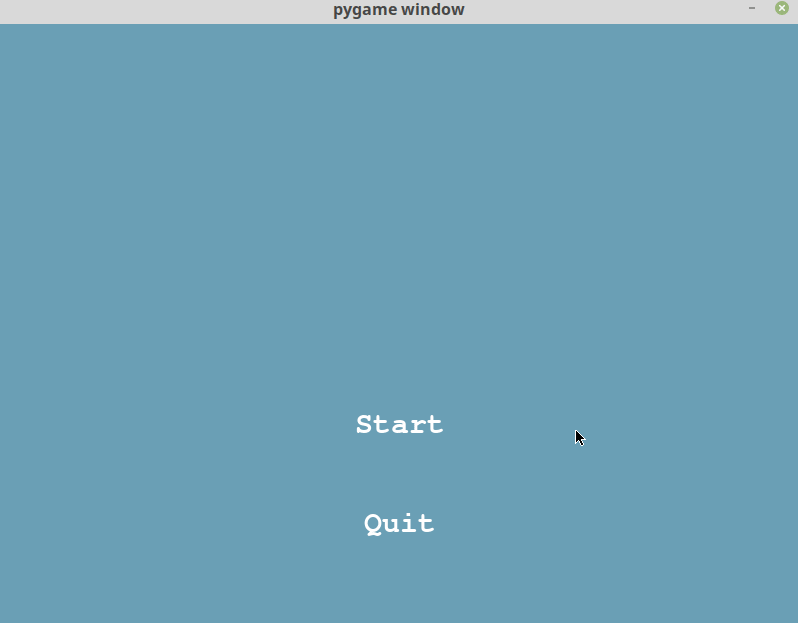
Now we need to create the title_screen function, much of this code should be familiar as it's very similar to what we used to have in main. We're going to make two buttons which update during every game loop. One has a NEWGAME action and the other QUIT. The game loop ends when one of the buttons is clicked and the action value from the button is returned to the main function.
def title_screen(screen):
    start_btn = UIElement(
        center_position=(400, 400),
        font_size=30,
        bg_rgb=BLUE,
        text_rgb=WHITE,
        text="Start",
        action=GameState.NEWGAME,
    )
    quit_btn = UIElement(
        center_position=(400, 500),
        font_size=30,
        bg_rgb=BLUE,
        text_rgb=WHITE,
        text="Quit",
        action=GameState.QUIT,
    )

    buttons = [start_btn, quit_btn]

    while True:
        mouse_up = False
        for event in pygame.event.get():
            if event.type == pygame.MOUSEBUTTONUP and event.button == 1:
                mouse_up = True
        screen.fill(BLUE)

        for button in buttons:
            ui_action = button.update(pygame.mouse.get_pos(), mouse_up)
            if ui_action is not None:
                return ui_action
            button.draw(screen)

        pygame.display.flip()
Similarly, we're going to make a play_level function that will act like the first level of our game. The level will have one button to return to our main menu and nothing else.
def play_level(screen):
    return_btn = UIElement(
        center_position=(140, 570),
        font_size=20,
        bg_rgb=BLUE,
        text_rgb=WHITE,
        text="Return to main menu",
        action=GameState.TITLE,
    )

    while True:
        mouse_up = False
        for event in pygame.event.get():
            if event.type == pygame.MOUSEBUTTONUP and event.button == 1:
                mouse_up = True
        screen.fill(BLUE)

        ui_action = return_btn.update(pygame.mouse.get_pos(), mouse_up)
        if ui_action is not None:
            return ui_action
        return_btn.draw(screen)

        pygame.display.flip()
That's step 3 complete. If running your script doesn't give you the same result as the gif shown at the start of this step then compare your script to this gist.
Step 4: Using sprite renderers, storing player attributes and tidying up
Our code is starting to look useful but in a real game we might want to keep track of things like which level the player is on, how many lives they have or what their score is. We'll add that in now as well as replace our manual draw calls with a sprite renderer that will handle the drawing of all our buttons. Here's what we should have at the end of this step.
First we need add one of pygame's sprite renderers to our list of imports.
from pygame.sprite import RenderUpdates
Then we'll add a data class to store some player attributes.
class Player:
    """ Stores information about a player """

    def __init__(self, score=0, lives=3, current_level=1):
        self.score = score
        self.lives = lives
        self.current_level = current_level
In the main function we want to create a player instance before we start a new game and add a game state check for when we need to move to the next level.
if game_state == GameState.NEWGAME:
    player = Player()  # new line
    game_state = play_level(screen, player)

# new block
if game_state == GameState.NEXT_LEVEL:
    player.current_level += 1
    game_state = play_level(screen, player)
To help tidy up our title_screen and play_level functions make a game_loop function. This function manages the game loop until one of the buttons is pressed, at which point it returns the button's action value.
def game_loop(screen, buttons):
    """ Handles game loop until an action is return by a button in the
    buttons sprite renderer.
    """
    while True:
        mouse_up = False
        for event in pygame.event.get():
            if event.type == pygame.MOUSEBUTTONUP and event.button == 1:
                mouse_up = True
        screen.fill(BLUE)

        for button in buttons:
            ui_action = button.update(pygame.mouse.get_pos(), mouse_up)
            if ui_action is not None:
                return ui_action

        buttons.draw(screen)
        pygame.display.flip()
This function could be extended later to draw more objects but at the moment we only have buttons but it allows us to simplify some of our other functions. The title_screen function still has two buttons but now they're added to a RenderUpdates collection and game_loop is called with the result returned.
def title_screen(screen):
    start_btn = UIElement(
        center_position=(400, 400),
        font_size=30,
        bg_rgb=BLUE,
        text_rgb=WHITE,
        text="Start",
        action=GameState.NEWGAME,
    )
    quit_btn = UIElement(
        center_position=(400, 500),
        font_size=30,
        bg_rgb=BLUE,
        text_rgb=WHITE,
        text="Quit",
        action=GameState.QUIT,
    )

    buttons = RenderUpdates(start_btn, quit_btn)

    return game_loop(screen, buttons)
Add a player argument to the play_level function so that player data (current_level etc.) can be passed in. Add a new button to the play_level function and give it the action of next level. After button creation we just need to return the result of game_loop like in the title_screen.
def play_level(screen, player):
    return_btn = UIElement(
        center_position=(140, 570),
        font_size=20,
        bg_rgb=BLUE,
        text_rgb=WHITE,
        text="Return to main menu",
        action=GameState.TITLE,
    )

    nextlevel_btn = UIElement(
        center_position=(400, 400),
        font_size=30,
        bg_rgb=BLUE,
        text_rgb=WHITE,
        text=f"Next level ({player.current_level + 1})",
        action=GameState.NEXT_LEVEL,
    )

    buttons = RenderUpdates(return_btn, nextlevel_btn)

    return game_loop(screen, buttons)
That's the final step complete! If running your script doesn't give you the same result as the gif shown at the start of this step then compare your script to this gist.
It looks as though something is blocking our newsletter signup form. If you would like to signup you can send an email to danny@programmingpixels.com. We will only ever send you updates of our latest blog posts and your data will never be shared with anyone, ever.
It looks as though something is blocking our comments system. Comments on this site are powered by the lightweight, privacy-focused commenting platform commento.